
My First Vibe Coding Project: What I Built, What I Learned, and What I’d Tell You Before You Start

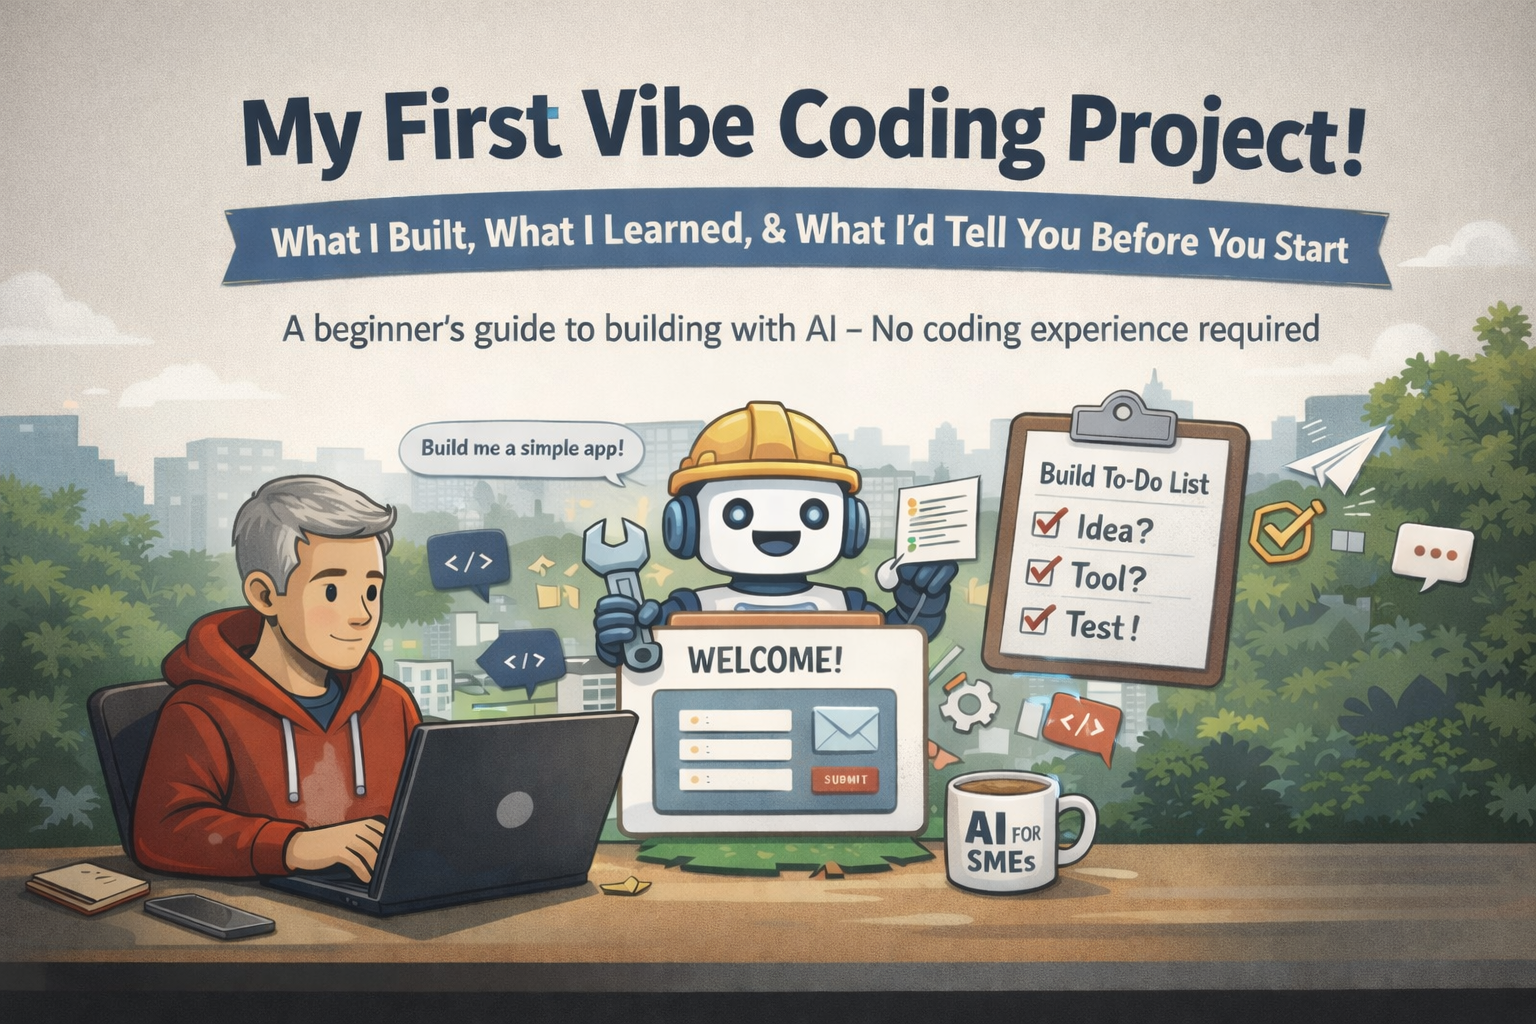
A beginner’s honest guide to building something real with AI — no coding experience required
Introduction: Why I Decided to Build Something (Instead of Just Reading About It)
I’ve spent the last three years exploring AI, following its rapid progress since ChatGPT arrived in late 2022. I’ve tested and tinkered with everything from text and image generators to research assistants like ChatGPT, Gemini and Claude — and I’ve shared plenty of it here through blog posts and webinars — with one simple aim: helping UK SMEs cut through the noise and hype and focus on what’s genuinely useful.
That journey gave me a solid understanding of what generative AI can do and, just as importantly, where it falls short. But recently, a question started nagging me: what if I stopped just writing about AI and started building with it?
This is when I decided to start exploring vibe coding — the idea that you can describe what you want to build in plain English and let AI generate the code for you. No programming knowledge required. Just clear, thoughtful prompting pointed at creating something real. It felt like the natural next step.
My goal now is simple: pick a tool, build something small, learn fast, and share the whole process with you. No polished case study, just an honest account of a non-coder making the leap from AI user to AI builder.
This post covers what vibe coding actually is, why I chose it over no-code platforms like Bubble.io, the criteria I used to pick my tools, the challenges I hit, and the practical lessons I’d pass on to anyone thinking about making that same leap.
What Is Vibe Coding? (And How Does It Differ from No-Code?)
The term “vibe coding” was coined by AI researcher Andrej Karpathy in February 2025. The idea is straightforward: instead of writing code line by line, you describe what you want to build in plain English (or whatever language you think in), and an AI tool generates the code for you. You guide, refine, and test — but you’re not manually typing out programming Syntax (the specific rules for writing instructions so software can interpret them correctly).
Think of it as having a conversation with a very capable junior developer. You say, “Build me a simple landing page with a contact form,” and the AI has a go. You look at the result, suggest changes, and iterate. That’s the loop.
Popular Vibe Coding Tools
• Lovable — A Swedish startup that’s grown rapidly. You describe your app in natural language and it generates a full-stack web application. Strong on visual output and quick prototyping.
• Replit — A browser-based platform with a powerful AI agent that can build, test, and deploy apps. Good community and learning resources.
• Cursor — An AI-powered code editor popular with developers. More technical, but very capable.
• Bolt.new — Quick app generation from prompts, runs in the browser.
• ChatGPT / Claude — Not vibe coding tools per se, but invaluable as thinking partners and code-generation assistants alongside the above.
After weighing these up, I went with Lovable as my primary build tool, paired with ChatGPT as my thinking and troubleshooting partner. Lovable had a generous free tier, a low learning curve, produced real deployable web apps, and the code it generated was exportable — meaning no lock-in.
The Tech Under the Hood (In Plain English)
If you’re wondering how "typing a sentence" turns into a "working app," it’s helpful to understand the Tech Stack Lovable is building for you. Even as a non-coder, knowing these terms helps you "speak developer" if you ever need to scale.
- The Look (Frontend): Lovable uses React and Tailwind CSS. These are the same industry standards used by companies like Meta and Netflix. It means your app isn’t a "black box"—it’s modern, professional code that any developer could step in and work on later.
- The Brain (Backend): When your app needs to "remember" a user or "store" data, it uses Supabase. This is your database. My "rabbit hole" happened because I didn't realize the brain (Supabase) needed to be manually connected to the body (Lovable).
- The Logic (Edge Functions): For my SEO checker, the AI wrote "Edge Functions." These are tiny snippets of code that run in the cloud to do the heavy lifting—like fetching a URL and analyzing its tags—without slowing down the user's screen.
The Golden Rule of Vibe Coding: You aren’t just "generating a page"; you are directing an AI to write a Full-Stack Application. Keeping this distinction in mind helps you write better prompts because you’ll start thinking about what the user sees versus what the app does.
What About No-Code / Low-Code Tools?
As you research these tools you'll also come across no-code and low-code platforms — and Bubble.io is one of the most established. If you've been in this space, you've probably seen it mentioned. Bubble is a visual development platform where you drag, drop, and configure logic without writing code. It's powerful, it has a large and active community, and people have built genuinely impressive applications with it — from marketplaces to SaaS products. For many builders, it's an excellent choice.
So why didn't I go with it? It came down to three things that mattered specifically to me and my situation — not flaws with the platform itself.
1. Cost — I Needed to Stay Close to Zero
Bubble has a free tier, and there's a wealth of free training content from the community. For many users, the paid plans offer good value — especially if you're building a business tool you'll use long-term. But for my purposes — a first learning project with no budget — I was conscious that the free plan has limitations and that I'd likely need to upgrade fairly quickly to build anything meaningful. Bubble's pricing is based on "Workflow Units," which scale with usage, so costs can grow as your app gets more traffic. That's fair and transparent, but for someone just experimenting, I wanted a tool where I could go further before hitting a paywall.
2. Portability — I Wanted to Take My Code With Me
Bubble is a hosted platform, which means your app lives on their infrastructure. That's actually a benefit for many people — you don't have to worry about servers, hosting, or deployment. The trade-off is that you can't export your application's source code. If you ever want to move to a different platform, you'd need to rebuild rather than migrate.
For a first project, this might not matter at all. But one of my criteria was choosing tools where the skills and outputs could scale to bigger projects later. I liked the idea that with vibe coding, the generated code was mine to keep, move, and modify however I wanted. It was a personal preference more than a criticism of Bubble's approach.
3. Security — Different Model, Different Responsibilities
Bubble takes security seriously, and it shows. The platform is hosted on AWS, data is encrypted in transit, and it's passed independent security audits. For most users, that's a solid foundation — arguably better than what most beginners could set up on their own.
Where it gets more nuanced is around control. Your data lives on Bubble's servers, and you have limited say over where those servers are located unless you're on an enterprise plan. You're also responsible for configuring your own data privacy rules within the app — if those rules aren't set up correctly, data could be exposed. That's true of most platforms, to be fair, but it's worth being aware of.
For my needs, I wanted slightly more control over where data lived and how security was handled. But I'd stress that Bubble's security model is perfectly adequate for a wide range of use cases — it's just a different approach, not a weaker one.
In short: Bubble is a strong platform that's well-suited to many builders. It just wasn't the best fit for what I was looking for at this stage. If portability and zero-cost experimentation are less important to you, it's absolutely worth exploring.
My Decision Criteria: How I Chose My Tools
Before jumping into any tool, I sat down and worked out what actually mattered to me. Here were my five criteria:
- Cost: I needed to keep spending to a minimum. I’m not funded. I’m a blogger with an idea. Free tiers and low entry costs were essential.
- Learning curve: How quickly could I go from “I have no idea what I’m doing” to “I have a rough idea what I’m doing”? I wanted a tool I could learn in days, not months.
- Shareability: Could I document the process and share it in a blog post? If the tool was so complex that the learning wasn’t transferable, it wasn’t right for my audience.
- Scalability: Could I take what I learned and apply it to bigger, more ambitious projects later? I didn’t want a dead end.
- Understanding what's actually being built: Could I get a feel for what the AI was actually building? I wasn't trying to become a developer, but I wanted to understand the basics — what a frontend is, what a database does, how they connect. A tool that exposed me to those concepts, even gently, would be more valuable long-term than one that abstracted everything away.
As discussed earlier I went with Lovable paired with ChatGPT.
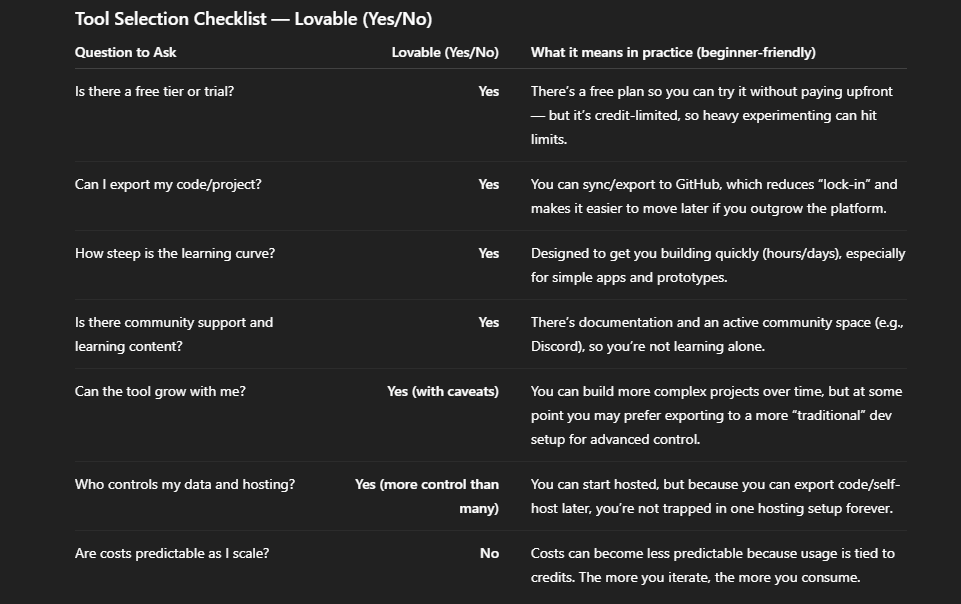
Tool Selection Checklist
Before you pick your own tool, run through this checklist. It’s what I wish I’d had when I started:
What I Built (and Why I Kept It Simple)
I'll be honest: I have grand plans. The sort of ideas that sound brilliant at 11pm on a Tuesday and completely terrifying at 9am on a Wednesday.
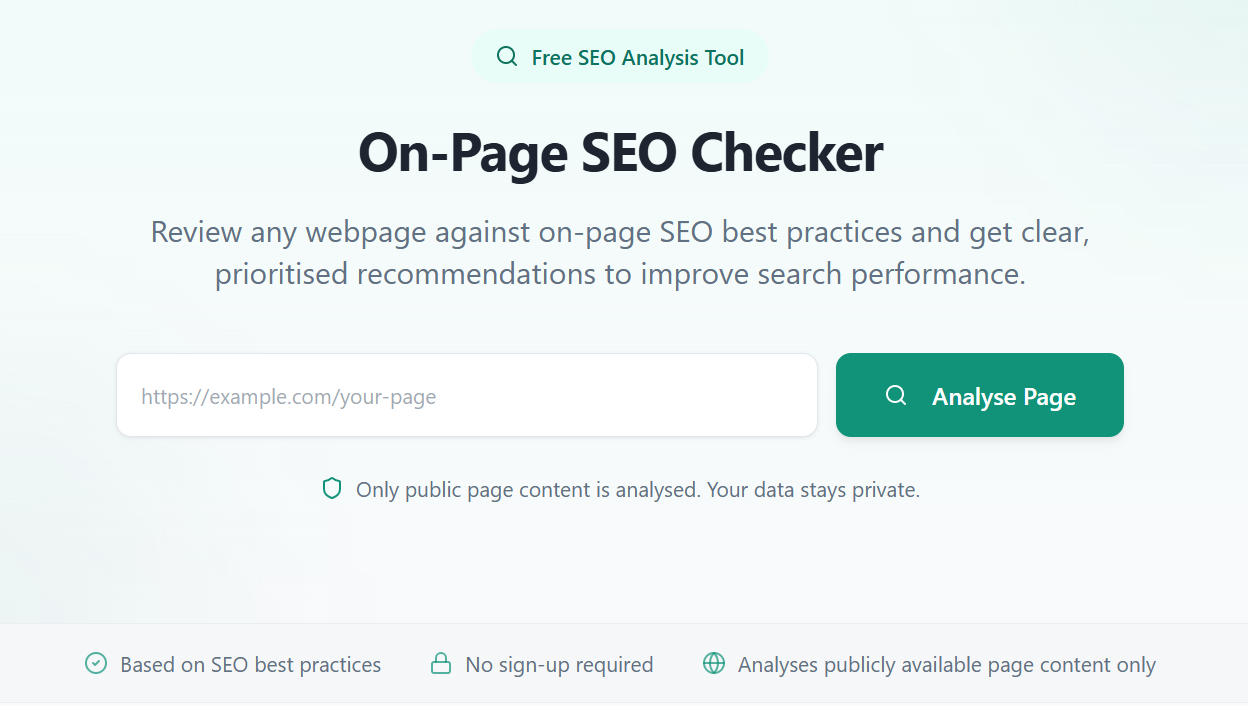
Instead, I took my own advice and started small. I chose to build an On-Page SEO Checker — a simple tool where you enter a URL , and it checks basic SEO elements like title tags, meta descriptions, heading structure, and keyword usage. Nothing groundbreaking, but something genuinely useful for the small business owners I write for.
This turned out to be one of the smartest decisions I made. A simple project gave me room to make mistakes, learn the workflow, and actually ship something. If I'd gone straight for the complex build, I'd probably still be stuck on step one and questioning my life choices.
My Process: How Lovable and ChatGPT Worked Together
Here's roughly how my workflow looked:
Step 1: Blueprint with ChatGPT. I gave ChatGPT an outline of what I wanted to build and worked with it to develop a blueprint — the features, the user flow, what the interface should look like. We went back and forth refining it until I had something clear enough to hand to Lovable.
Step 2: Draft the Lovable prompts. Once the blueprint was solid, I asked ChatGPT to draft the prompts I could paste into Lovable. This made a real difference — instead of me trying to describe the app from scratch in Lovable, I had a well-structured prompt ready to go.
Step 3: First prompt into Lovable. I pasted the prompt into Lovable and let it generate the initial version. The first output was functional — it had the headline, an input field, a button, and the layout was all there. But it felt flat and generic, like a prototype rather than a real tool. So my next prompt focused on making it feel more professional: adding trust signals, tightening the copy, and designing the empty results area so the page looked intentional even before you'd run an analysis. That's when it started to look like something I'd actually share.
Step 4: Review and refine. The first output was never perfect (nor should you expect it to be). I'd look at what was generated, identify what needed changing, and prompt Lovable to adjust.
Step 5: Use ChatGPT for support. When I got stuck — which happened regularly — I'd describe my problem to ChatGPT and ask for help understanding what had gone wrong or how to phrase my next prompt.
Step 6: Test and iterate. Build, test, refine, repeat. The cycle was surprisingly quick once I got into the rhythm of it.
The combination worked well because Lovable handled the actual code generation, while ChatGPT helped me think through problems and understand why things were or weren't working.
The Challenges (Because It Wasn't All Plain Sailing)
1. Deciding What to Build
This took far longer than it should have. I kept going back and forth between ideas, worried about picking the wrong one. The lesson? It almost doesn't matter what you build first (I decided to keep it simple for my first project). The point is to learn the process. Just pick something and go.
2. Choosing the Right Tools
The sheer number of options was paralysing. Lovable, Replit, Cursor, Bolt, Bubble, Glide, FlutterFlow — every one of them promising to be the best. I spent too long comparing features and reading reviews when I should have just picked one and started. Analysis paralysis is real, and it's the enemy of progress.
3. ChatGPT Rabbit Holes
This one caught me off guard. ChatGPT is brilliant, but it can also confidently take you in completely the wrong direction. At one point, ChatGPT walked me through connecting Supabase to Lovable — step-by-step, very confident, very detailed. "Go to Integrations, click Supabase, accept the defaults." The problem? The menu it was describing didn't exist in my version of Lovable. I told ChatGPT I couldn't find it. It gave me alternative steps. Those didn't match either. We went back and forth for probably fifteen messages — each time it gave me a new set of instructions, each time I couldn't find what it was describing. It was like being given perfect driving directions to a building that had moved. Eventually I stepped away, came back with a clearer prompt, and found the answer in Lovable's own documentation in about two minutes.
The fix? Better prompting. I learnt to be more specific in my questions, to push back when an answer felt overly complicated, and to ask ChatGPT to explain why it was suggesting something rather than just accepting the output. If a solution felt like it was getting away from me, I'd stop, take a breath, and start a fresh conversation with a clearer prompt.
4. Something That Went Properly Wrong
Following on from the Supabase saga, I eventually realised I'd been trying to connect something that didn't actually exist yet. ChatGPT had walked me through connecting Supabase to Lovable as though I already had a project set up — but I didn't. I had a Supabase account, but no project inside it. Once I spotted the gap, the fix was simple — create the project, connect it, done in five minutes. But it had taken me far longer to realise that was the problem. The lesson: when something isn't working and the instructions seem right, check your assumptions. The issue might not be what you're doing — it might be what you haven't done yet.
5. Privacy and Security Concerns
When you're building with AI tools, you're often sharing project details, descriptions, and prompts with third-party services. I had to think carefully about what data I was comfortable sharing and where. This is something every builder should consider early on, not after the fact.
6. Good Old-Fashioned Procrastination
Let's be real. Sometimes the hardest part of building something is just sitting down and doing it. I found myself "researching" when I should have been building, and "planning" when I should have been testing. If this sounds familiar: you're not alone, and the only cure is to start.
Lessons Learnt
1. Cut Through the Noise — Just Pick a Tool and Start
I wasted too much time comparing tools. The differences between Lovable, Replit, and similar platforms matter less than actually using one. Pick a tool that meets your basic criteria, commit to it for your first project, and learn by doing. You can always switch later.
2. Online Courses Are Worth the Time
Even a short introductory course on your chosen tool can save hours of frustration. Understanding the basics of how the tool works — its interface, its quirks, its limitations — means you spend less time fighting it and more time building with it.
3. Getting It Wrong Is Part of the Process
This isn’t a platitude; it’s literally how you learn. My first attempts were messy. I had to start sections over. And every single one of those mistakes taught me something. If you’re not getting things wrong, you’re probably not pushing yourself enough. Step away when you need to, come back with a clear head, and keep going.
4. Start Small, Even If Your Ideas Are Big
I had a dozen ambitious project ideas. I’m glad I shelved them and started with something simple. A manageable first project lets you learn the fundamentals without drowning in complexity. The big ideas will still be there once you’ve got the basics down.
5. Be Intentional with Your AI Prompts
Working with ChatGPT (or any AI assistant) is a skill in itself. Don't rush your prompts. Be specific about what you want. If the answer doesn't feel right, question it. Ask the AI to explain its reasoning. And if you find yourself going down a rabbit hole, stop and re-approach from a different angle. The quality of your prompts directly determines the quality of the help you get.
Here's an example of the difference good prompting makes:
Vague prompt: "The SEO checker isn't working properly, can you fix it?"
Better prompt: "Add an overall SEO score out of 100 to the results section. Calculate it based on the existing checks — title tag worth 25 points, meta description 20, H1 heading 20, HTTPS 15. Full points for a pass, half for a warning, zero for a fail. Display it prominently with a short explanation that it reflects best practice, not rankings."
The vague prompt left ChatGPT guessing. The specific one got me a fix in one response.
Practical Takeaways for You
If you're a small business owner, a blogger, a freelancer, or just someone who's curious about building things with AI, here's what I'd want you to take away from this:
- You don't need to be a developer. Vibe coding tools are specifically designed for people who can describe what they want but can't write the code themselves.
- Start with the smallest possible project. Something you can finish in a weekend is ideal.
- Use a Tool Selection Checklist use my example above (add criteria that's important to you and remove what isn't) before committing to a platform.
- Pair a build tool (like Lovable or Replit) with a thinking tool (like ChatGPT or Claude). They complement each other brilliantly.
- Don't let perfectionism stop you from shipping. Done is better than perfect, especially for a first project.
- Share what you learn. Writing about the process helps you consolidate your learning — and it helps others who are a step behind you.
The outcome of my first vibe coding build is an On-Page SEO Checker.
Over to You
This was my first proper build, and I’m under no illusions that it was perfect. But it was real, it was finished, and I learned more in a few weeks of doing than in months of reading about it.
If you’re sitting on an idea and wondering whether you can actually build it without knowing how to code: yes, you can. The tools are there. The learning resources are there. The only thing missing is your decision to start.
I’d love to hear from you. Have you tried vibe coding or no-code tools? What did you build? What challenges did you face? Drop a comment below or get in touch via the blog — I read everything and I’m always happy to chat.
Happy building.
I publish one free blog post a month on practical AI for UK small businesses — no jargon, no upsell, just honest lessons from someone figuring it out in public. If you want to follow the journey and get each new post straight to your inbox, subscribe free at aiforsmes.co.uk. I’d love to have you along for the ride.